How To Export Exchange Mailbox To PST/Office 365 by Using Free Methods
There are different methods to migrate from any Exchange server to Office 365, counting on what percentage mailboxes you’re exporting, their size and if you’ve got any public folders during a migration plan. It’s quite easy to modify to Office 365 as all you would like is to get the licenses (commonly used are Microsoft 365 Basic or Microsoft 365 Standard), create the users and assign the licenses, change the domain DNS, and begin using them. However, the matter is the way to export the info from Exchange and import it into Office 365 within the quickest way possible with no disruption to the users in order that business isn’t affected.
You can first export the Exchange mailboxes to Outlook PST then the PST file are often exported to Office 365 by using PowerShell, Exchange Admin Center (EAC) and Outlook. Let’s explore these three free methods to export Exchange mailboxes to Office 365.
Use PowerShell to export mailboxes
If you’ve got Exchange Server 2010 with Service Pack 1 (SP1) or newer, you’ll use PowerShell to export mailboxes to PST. you would like to open the Exchange Management Shell (EMS) window and sort the command (as given below) to export a mailbox.
New-MailboxExportRequest -mailbox user1 -filepath \\myserver\sharedfolder\user1.pst
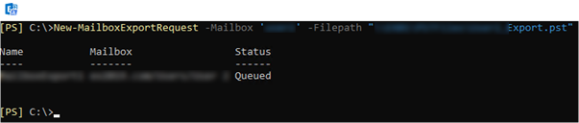
When exporting with PowerShell, you can’t use the direct path like D:\pstfilelocation\user1.pst. you want to use the complete network path. For this to figure , you want to create a folder and share it with the user you’re using to export and therefore the Exchange Trusted SubSystem as full control on the folder and share.
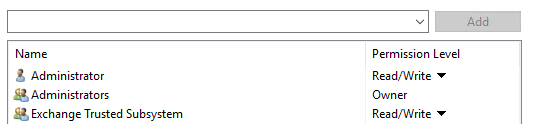
Apart from that, you would possibly got to check if the user you’re using has the proper permission. this will be done by adding the user to the export role from the Exchange Admin.
On the Exchange Admin Center, attend the Admin Roles under Permission and make a replacement role and assign the user to the role.

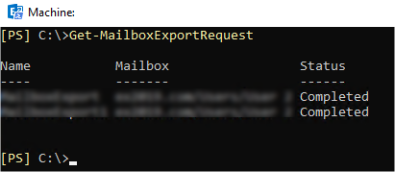
Once this is often done, you’ll export the mailboxes to PST. you’ll use some filtering to granularly export from Exchange.
To include only a folder, you would like to feature -includefolder with the name of the folder in inverted commas. To export all the mailboxes, excluding a folder, you would like to use the -excludefolder parameter. you’ll add multiple folders by separating them with commas. See the examples below.
New-MailboxExportRequest -Mailbox ‘user1’ -Filepath “\\SRV01\PSTFiles\User1.pst”-IncludeFolders “#Inbox#”, “#Outbox#”
New-MailboxExportRequest -Mailbox ‘user1’ -Filepath “\\SRV01\PSTFiles\User1.pst”-ExcludeFolders “#Drafts#”, “#Outbox#”
You can also filter the content by date by using the -ContentFilter parameter, with lt (less than) or gt (greater than).
With the lt parameter, you can specify a date limit to export everything which is less than the specified date . See the examples below.
New-MailboxExportRequest -ContentFilter {(Received -lt ’01/01/2019′)} -Mailbox ‘User1’ -Filepath “\\SRV01\PSTFiles\User1.pst”
The gt parameter will export everything after the specified date.
New-MailboxExportRequest -ContentFilter {(Received -gt ’01/01/2019′)} -Mailbox ‘User1’ -Filepath “\\SRV01\PSTFiles\User1.pst”
You can have a combination of both content filters to export data of a specific period from the mailbox (see the below example).
New-MailboxExportRequest -ContentFilter {(Received -lt ’01/01/2020′) -and (Received -gt ’01/01/2019′)} -Mailbox ‘User1’ -Filepath “\\SRV01\PSTFiles\User1.pst”
Once the export process is started, you can monitor the status of export by using the below command. It isn’t elaborate but you would know the status as running, completed and failed.
Use the Exchange Admin Center
To export with the Exchange Admin Center, you want to have the pre-requisites like permission on the user and share available with the right security.
Once you open the Exchange Admin Center, follow the given steps,
- Open the recipient’s section.
- Click on more options.
- Click on Export to a PST file.
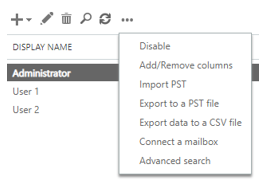
- Select the mailbox to export and click Next.
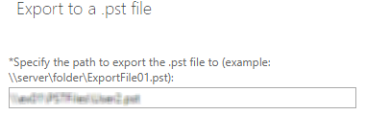
- In the next screen, enter the network path and the name of PST file for export.
- On the next screen, you can tick the option to be notified by email and select the user who will be informed by email when the export is done.
Use Outlook to export mailbox
To export mailboxes to PST by using Outlook,
- Click on Open & Export button under File and click on Import/Export.
- Click on Export to file, click next and then click on Outlook Data File (.PST).
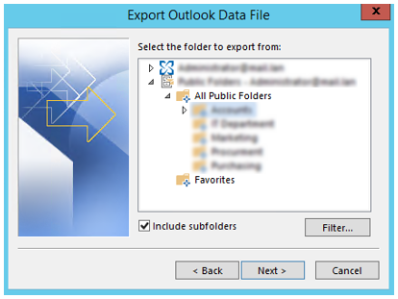
You can see the full structure of the account.
- Highlight the mailbox of the user and tick the Include subfolders option. Then click Next.
You can also choose to filter some items, by clicking on the Filter button.
You can also Migrate Exchange Server Mailboxes directly to Office 365.